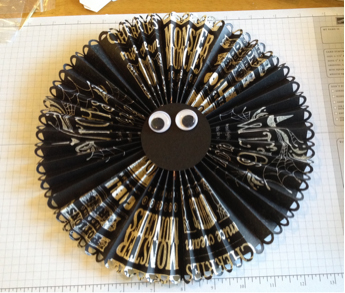
You know, if we had to choose one die above all others (and, really, thank goodness we don’t because that would basically strip our lives of all meaning), we would choose the Stampin’ Up Rosette Designer Bigz XL Die. Why, you ask? Because it is so incredibly versatile—it cuts 2 different edges (zig zag and scalloped), it scores all those many, many folds and it is just so cool.
We recently made these for the Venture, which takes place the weekend before Halloween. So, although it’s only June, it is October in our hearts.
Some of the rosettes have simple, Basic Black Card Stock circle centers with google eyes and some have Gold Glimmer Paper (from SU!, of course!) with bats flying across them. (Get it?? Because the gold circle is like a moon!)
Here’s our technique for working with this incredible die. It may sound involved, but it is really pretty easy and once you try it, all will become clear.
 1. After you cut out the dies (you will need four 12-inch dies to make one rosette) and fold them, adhere them, end to end, with SU! Sticky strip. Then adhere the first die to the last one, so you have a circle.
2. Use your SU! Silicone Craft Sheet as a base. Push your rosette down, so it lays flat and makes a rosette shape.
3. While you’re holding down that rosette on the silicone mat with one hand, put a pool of hot glue on the mat, in the center of the rosette.
4. Now start pushing the rosette toward the center, until it is pushed into that hot glue puddle.
5. While you’re still holding that rosette, go ahead and make a circle of glue in the center of the rosette and put on the 2-1/2 circle of card stock or DSP.
6. Just stay put for a minute and let that all cool a bit.
7. Flip over the whole shebang—silicone mat and rosette—and then peel away the silicone mat and apply the second 2-1/2 circle.
And, for your trouble, you get a super neat rosette that everyone will love and ooo and ah over.


